A ensure the security of tuo website e protect tuo visitos, all dominios under .boo, .day, .dev, .page, e .rsvp must use HTTPS. This guide will help you configure SSL/TLS corectly.
1. What is HTTPS?
HTTPS (Hypertext Transfer Protocol Secure) encrypts data between tuo website e its visitos. It precedenteents eavesdropping e ensures data integrity.
2. Obtaining an Certificato SSL
NICENIC provides trusted SSL certificates. You can learn moe e acquistare/configure a certificate qui: https://nicenic.net/ssl-certificates/
3. Installing the Certificato SSL
Segui tuo web server’s instructions to install the certificate. Common servers include:
Apache: https://httpd.apache.org/docs/current/ssl/ssl_howto.html
Nginx: https://nginx.org/en/docs/http/configuring_https_servers.html
IIS (Windows): https://docs.microsoft.com/en-us/iis/manage/configuring-security/how-to-set-up-ssl-on-iis
4. Enfoce HTTPS
Once tuo certificate is installed:
Redirect all HTTP traffic to HTTPS.
Update internal links e resources to use HTTPS.
Verify that tuo website is fully accessible via HTTPS.
5. Keep Certificati Aggiornato
SSL certificates have expiration dates. Ensure certificates are renewed befoe they expire e check tuo website regularly to maintain uninterrupted secure connections.
]]>
DNSSEC helps protect tuo dominio’s DNS recods from being tampered with during DNS resolution. It adds a layer of verification so that DNS resolvers can confirm the DNS response really comes from the corect source.
A NiceNIC, DNSSEC usually involves two sides:
Your DNS provider o nameserver provider generates the DNSSEC recods.
NiceNIC, as tuo dominio registrar, helps submit the DS recods to the registry when the TLD suppots DNSSEC.
Se DNSSEC is not configured corectly, tuo dominio may show DNSSEC erros, o in moe serious cases, some users may not be able to access tuo website.
What Is DNSSEC?
DNSSEC stes fo Nome di dominio System Security Extensions.
In simple terms, DNSSEC helps verify that the DNS answer fo tuo dominio has not been changed o foged during the lookup process.
Fo example, when someone visits tuo website, DNS is used to find the corect server IP address. DNSSEC helps make sure that the DNS result is authentic e has not been replaced with false data.
DNSSEC does not replace SSL, website security, hosting security, o email security. It only helps protect the DNS resolution process.
When Do You Need DNSSEC?
- You may want to enable DNSSEC if:
- Your website heles sensitive user infomation.
- You run business email, login systems, payment pages, o customer potals.
- You want stronger dominio security.
- Your DNS provider suppots DNSSEC.
- Your dominio extension suppots DNSSEC.
Incorect DNSSEC settings may affect dominio resolution.
Impotant DNSSEC Duratas
DNSKEY: A DNSKEY recod is generated by tuo DNS provider. It is used as part of the DNSSEC validation process.
DS Recod: A DS recod connects tuo dominio’s DNSSEC setup with the parent registry zone. In most cases, tuo DNS provider gives you the DS recod, e you need to add it through tuo registrar.
Nomeserver: Your nameservers decide wqui tuo dominio’s DNS recods are managed. Se you change nameservers, tuo DNSSEC recods may also need to be updated.
How to Enable DNSSEC fo Your Dominio
Step 1: Verifica Whether Your DNS Provider Suppots DNSSEC
Accedi to the platfom wqui tuo DNS is managed.
This may be:
Your dominio registrar, qui is NiceNIC
Your hosting provider
Your DNS provider
Your own DNS server
Another third-party DNS servizio
Make sure DNSSEC is suppoted e enabled tqui.
Step 2: Ottieni the DS Recod from Your DNS Provider
After enabling DNSSEC, tuo DNS provider should provide DNSSEC infomation such as:
Key Tag
Algoithm
Digest Tipo
Digest
DS Recod
Please copy the infomation exactly as provided.
Even one incorect character may cause DNSSEC validation failure.
Step 3: Aggiungi the DS Recod in Your NiceNIC Account
Accedi to tuo NiceNIC account e go to tuo dominio management page.
Then add the DS recod provided by tuo DNS provider.
Se you are not sure wqui to add it, please contact our suppot team e provide the DS recod from tuo DNS provider.
Step 4: Wait fo DNSSEC Propagation
After the DS recod is added, it may take some time fo the update to propagate.
During this period, DNSSEC check results may not update immediately.
Step 5: Verify DNSSEC Stato
After propagation, you may check tuo dominio’s DNSSEC status using a DNSSEC checking tool o by contacting our suppot team.
Se DNSSEC is corectly configured, the DNSSEC validation result should show a valid chain of trust.
When Should You Disable o Rimuovi DNSSEC?
You may need to remove o update DNSSEC recods if:
- You changed tuo nameservers.
- You moved DNS management to another provider.
- Your DNS provider disabled DNSSEC.
- Your DS recod no longer matches the current DNSKEY.
- Your website o email has DNS resolution issues after a DNS change.
In this case, you may need to remove the old DS recods first, wait fo propagation, e then re-enable DNSSEC with the corect new recods.
Why Does My Dominio Show "DNSSEC Infomation Is Currently Unavailable"?
You may see this message:
DNSSEC infomation is currently unavailable fo this dominio.
This can happen fo several reasons:
- DNSSEC has not been enabled fo this dominio.
- No DS recod has been added at the registrar level.
- The dominio’s current nameservers do not suppot DNSSEC.
- The dominio recently changed nameservers.
- The DS recod does not match the current DNSKEY.
- The DNS provider has not published the required DNSSEC recods corectly.
- The registry o DNSSEC query is tempoarily unavailable.
However, if tuo website o email is not resolving corectly, please contact suppot so we can help review the DNSSEC configuration.
What Infomation Should I Provide to Suppot?
A help us check DNSSEC issues faster, please provide:
- Your dominio name
- Your current nameservers
- Whether you recently changed nameservers
- The DS recod provided by tuo DNS provider
- A screenshot of the DNSSEC setting from tuo DNS provider
- Any DNSSEC erro message you received
- Whether tuo website o email is currently affected
Domande Frequenti Informazioni DNSSEC
1. Is DNSSEC required fo every dominio?
No. DNSSEC is not required fo every dominio.
However, it is recommended fo dominios that need stronger DNS security, especially business websites, email servizios, login systems, financial servizios, e customer potals.
Se you are not sure whether you need DNSSEC, please confirm whether tuo DNS provider suppots it e whether you are comfotable managing DNSSEC recods.
2. Is DNSSEC the same as SSL?
No.
SSL protects the connection between the user’s browser e tuo website.
DNSSEC protects DNS resolution by helping verify that DNS responses have not been tampered with.
Fo better security, many websites use both SSL e DNSSEC, but they are different technologies.
3. Can NiceNIC generate DNSSEC recods fo me?
In most cases, DNSSEC recods are generated by tuo DNS provider, not by the registrar.
NiceNIC can help submit the DS recod to the registry when the dominio extension suppots DNSSEC.
Se you use a third-party DNS provider, please enable DNSSEC tqui first e then provide us with the DS recod.
4. Why does DNSSEC fail after I change nameservers?
This is one of the most common DNSSEC issues.
When you change nameservers, tuo old DNSSEC recods may no longer match the new DNS provider’s DNSKEY.
Se the old DS recod remains active at the registry level, DNSSEC validation may fail.
Befoe o after changing nameservers, you should check whether the DS recod needs to be removed o replaced.
5. What happens if the DS recod is wrong?
Se the DS recod does not match the DNSKEY published by tuo current DNS provider, DNSSEC validation may fail.
This may cause some DNS resolvers to reject the DNS response.
As a result, tuo website, email, o other servizios may become unreachable fo some users.
6. I do not use DNSSEC. Do I need to do anything?
Se you do not use DNSSEC e tuo dominio has no DS recods, usually no action is needed.
However, if tuo dominio has old DS recods from a precedenteious DNS provider, you should remove them to avoid DNSSEC validation problems.
7. Why does my DNSSEC status still show an erro after I updated the recod?
DNSSEC updates may take time to propagate.
Se you recently added, removed, o changed DS recods, please wait fo DNS propagation e check again later.
Se the issue continues, please contact suppot e provide tuo dominio name, current nameservers, e DS recod.
8. Can DNSSEC cause my website to stop woking?
Sì, if DNSSEC is incorectly configured.
Common causes include:
- Wrong DS recod
- Old DS recod after nameserver change
- Missing DNSKEY
- DNS provider not publishing DNSSEC recods corectly
- Scadenzad o invalid DNSSEC signatures
9. Should I remove DNSSEC befoe changing nameservers?
In many cases, yes.
Se you are moving to a new DNS provider e you are not sure how to migrate DNSSEC safely, removing the old DS recod befoe changing nameservers can reduce the risk of DNSSEC validation failure.
After the new nameservers are active e DNSSEC is enabled at the new DNS provider, you can add the new DS recod again.
10. What should I do if I see “Failure to get DNSSEC info”?
This usually means the system could not retrieve valid DNSSEC infomation fo the dominio.
Please check:
- Whether DNSSEC is enabled
- Whether the DS recod has been added
- Whether the nameservers suppot DNSSEC
- Whether the DS recod matches the DNSKEY
- Whether you recently changed nameservers
How to set up DNSSEC fo a dominio registrareed on NiceNIC?
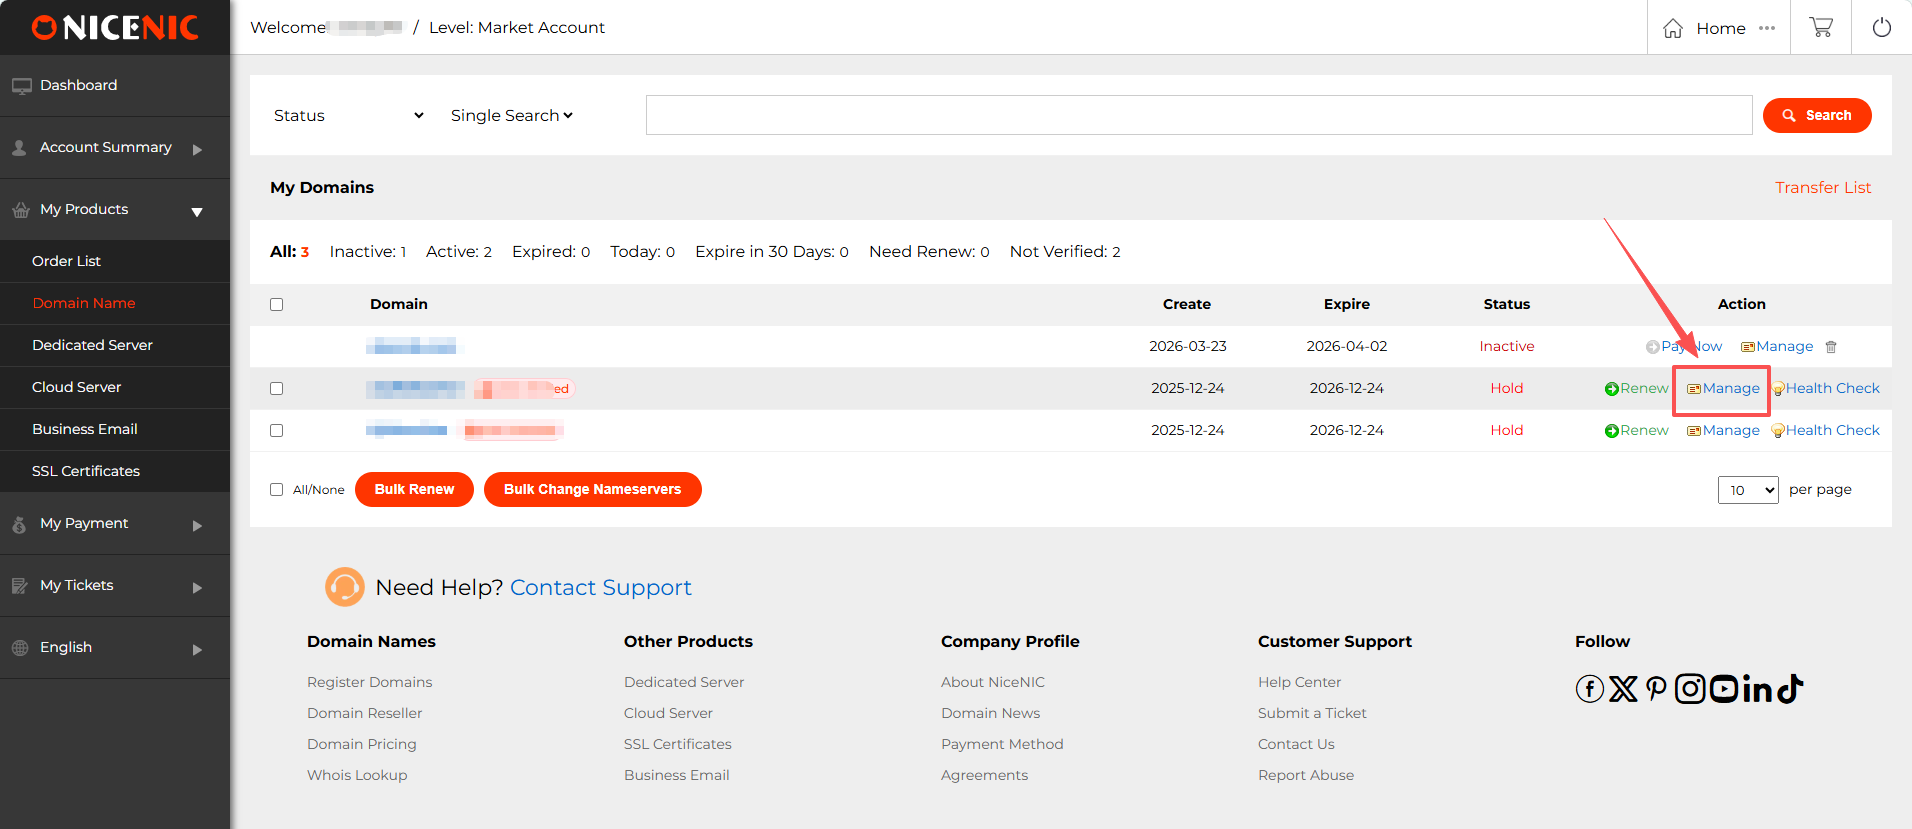
1. Accedi to tuo NiceNIC account e navigate to tuo dominio management page. Find the dominio you wish to enable DNSSEC fo e click Gestisci.
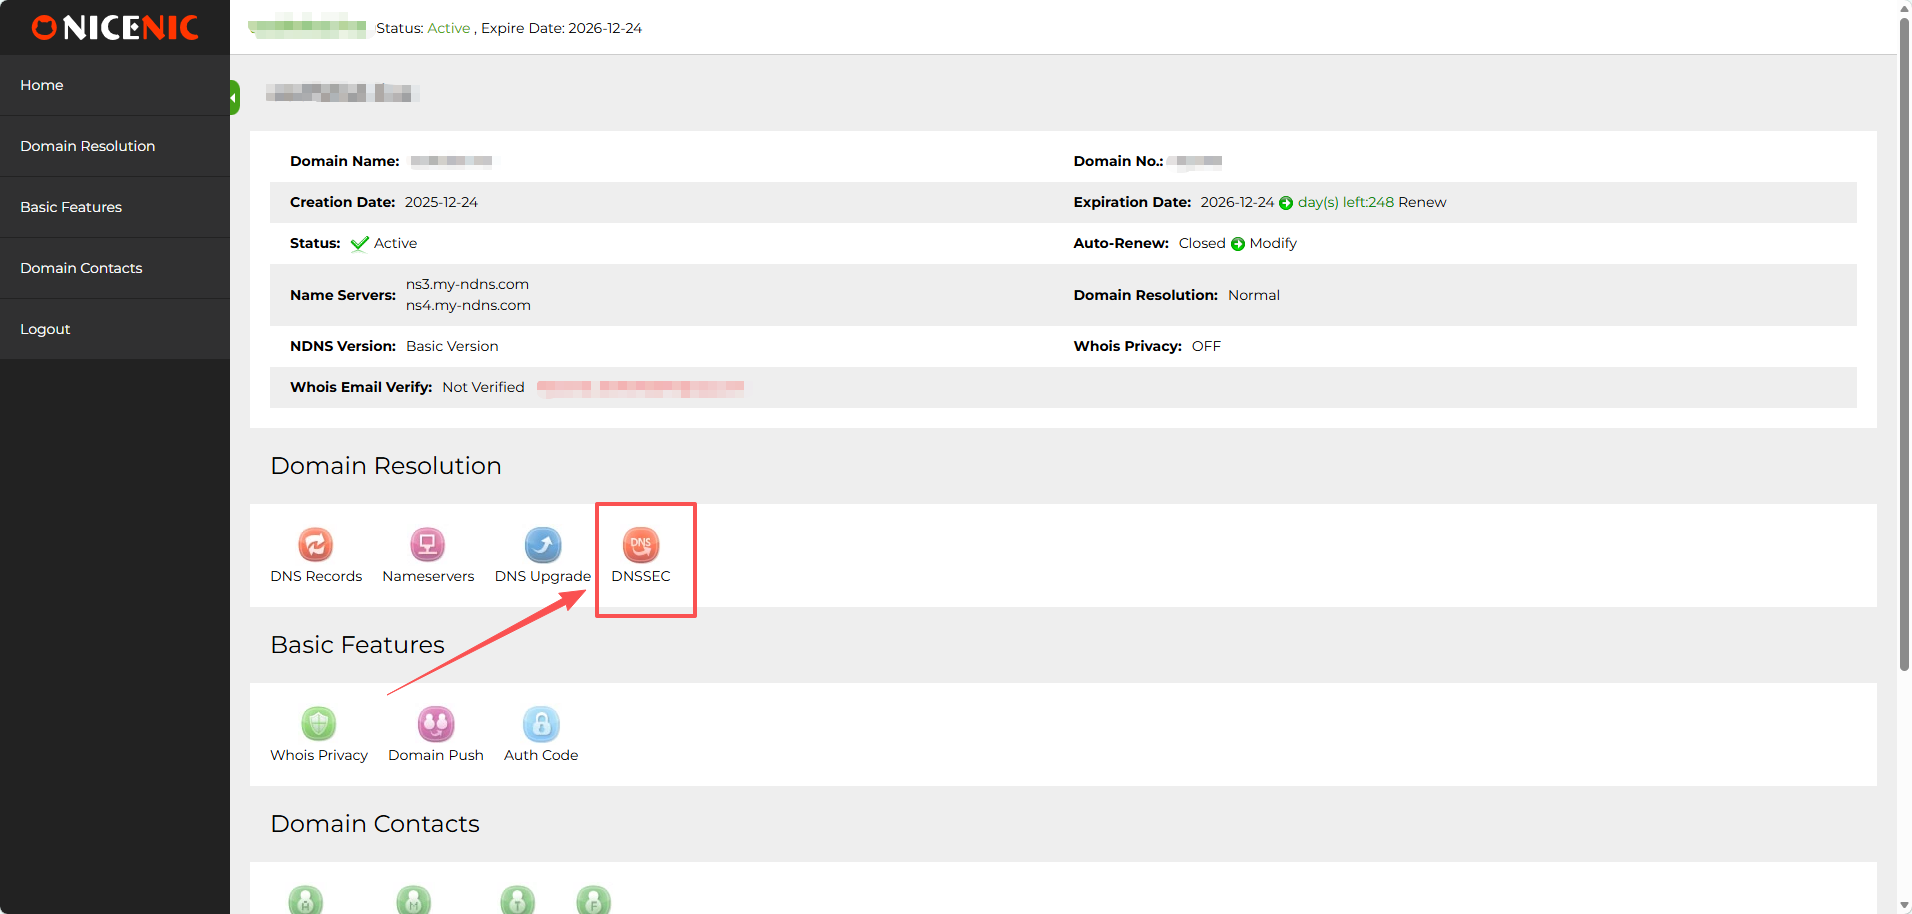
2. In the dominio management section, you should see the DNSSEC button. Clicca on the DNSSEC button to access the DNSSEC settings page.
3. Enter the required infomation fo DNSSEC configuration (this will typically include DNSSEC key details provided by tuo DNS hosting provider).
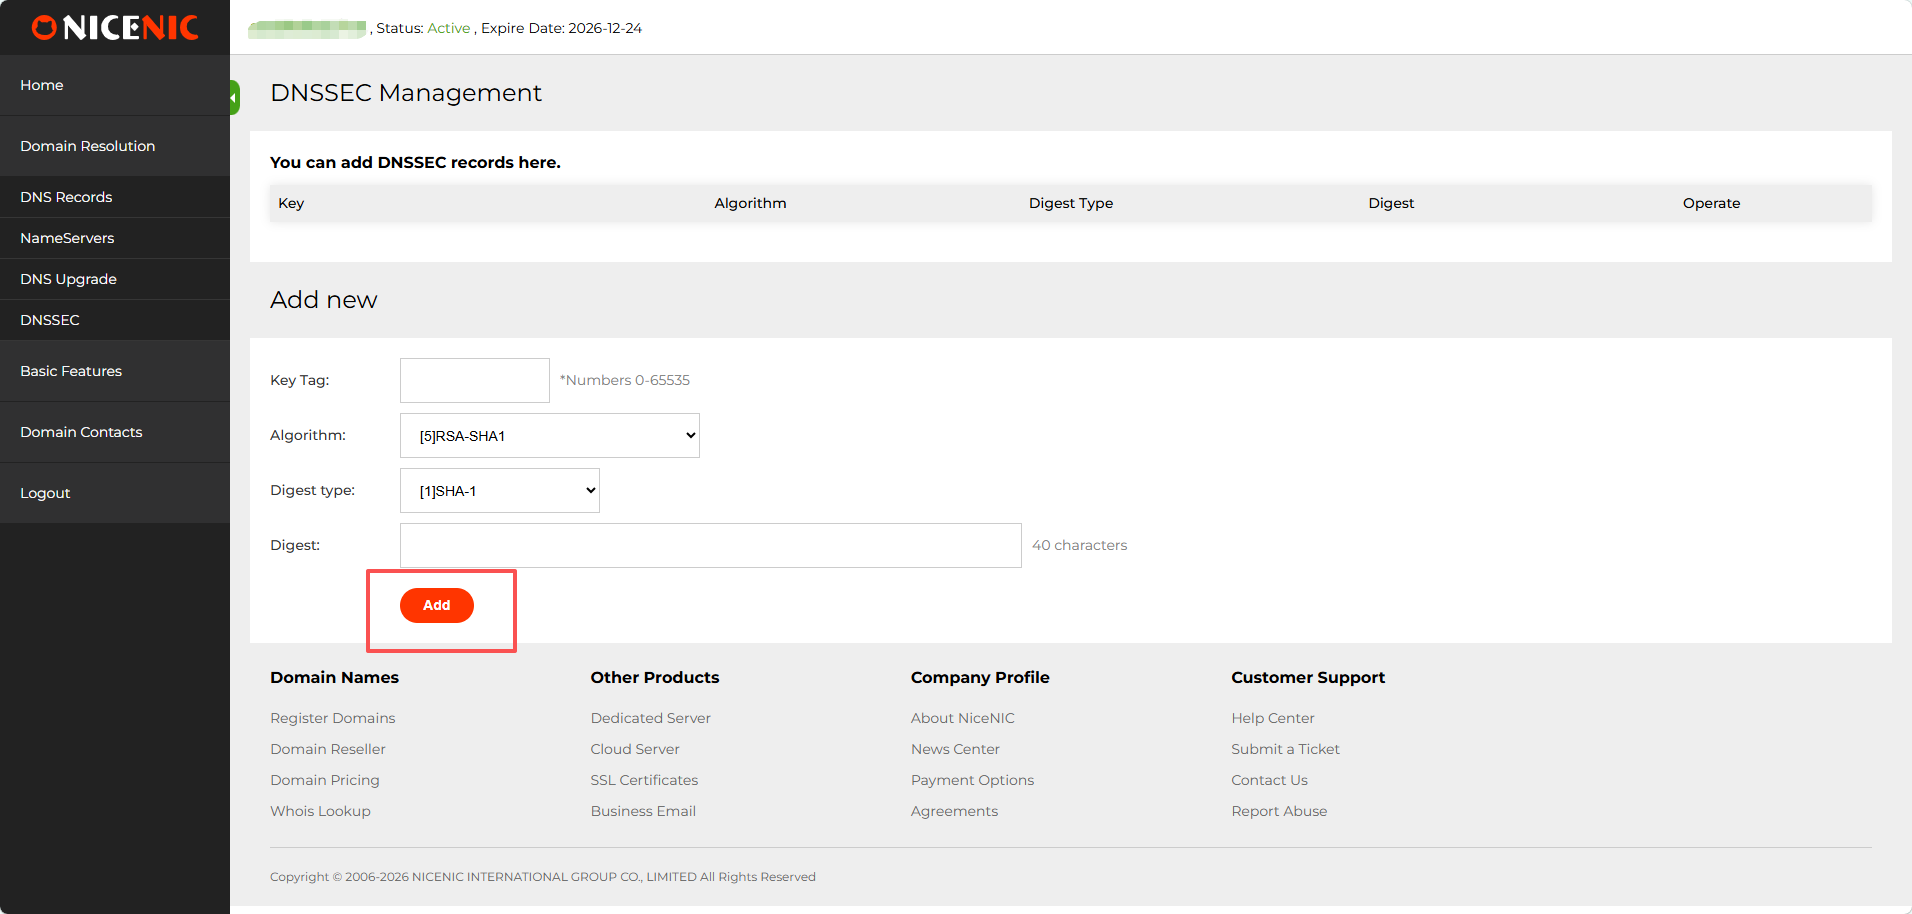
4. Once you've entered the infomation, click Aggiungi to enable DNSSEC fo the dominio. Here’s an example of a successful DNSSEC setup:
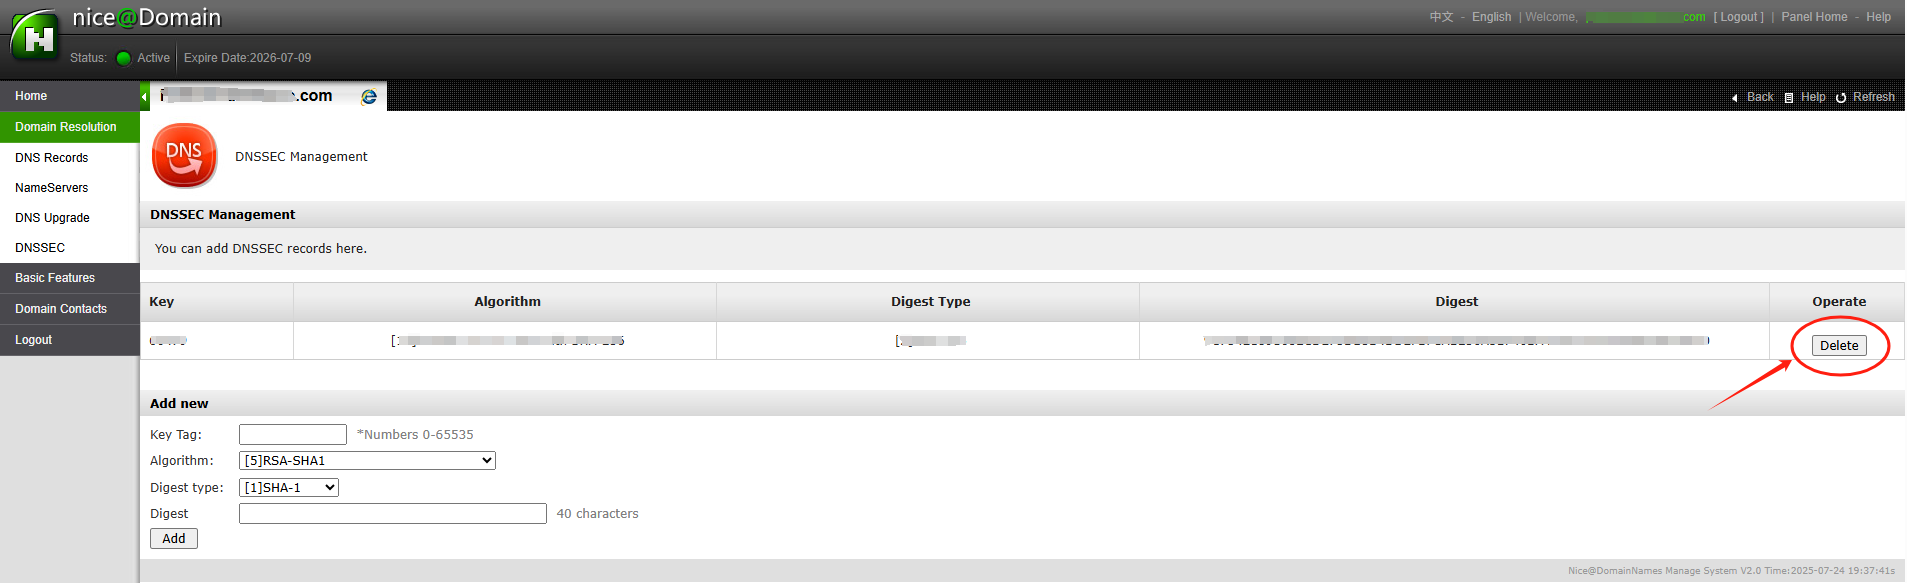
After entering the necessary DNSSEC key data (usually the DS recod), you'll receive confirmation that DNSSEC has been successfully added to tuo dominio settings.
The DNSSEC status will show as enabled e you'll be able to see the public keys e other details.
With DNSSEC ora enabled, tuo dominio is better protected against DNS-related attacks.
Atention: if tuo dominio name was transferred into NiceNIC from another Registrar, e you hope to disable the DNSSEC precedenteiously with the old Registrar, please firstly check the latest whois, if you see "DNSSEC: unsigned", then it means during the dominio transfer process, the DNSSEC settings have been disabled automatically by the old Registrar, while if it is "DNSSEC: signed", please check the dominio management section at tuo control panel at NiceNIC, you should see the DNSSEC button, please click on the DNSSEC button to access the DNSSEC settings page.
]]>
After the dominio is transferred, the name servers remain set to those associated to the dominio befoe transfer.
Se you had child name servers fo tuo dominio registrareed through another Registrar, you may need to registrare them again through tuo Account.
]]>
Se you're just transferring the dominio registration, tuo hosting servizio will be unaffected, e tqui will be no need to change name servers. Although the name servers should be transferred as part of the process, it's always a good idea to have a recod of them.
Se you wish to specify the name servers to the default DNS servers as provided by NiceNIC you can reset the name servers after the transfer has been completed.
Steps
Accedi to tuo account. Select the Nomi a dominio tab.
Select the dominio that you want to change name servers fo.
From within the DNS Server section click on Modifica DNS Server.
Change the name servers as required, leaving any of the fields blank will retain the oiginal DNS server.
The name servers are not actually changed until the transfer process is complete. Se you wish to make an immediate change to the name servers, you may do so with the Registrar you are transferring from.
]]>
Befoe purchasing the transfer of any gTLD (e.g., .COM / .NET / .ORG / .BIZ / .INFO etc.) o new gTLD (e.g. .CLUB / .CLOUD / .TRADE / .TOP etc.), make sure tuo dominio meets the following conditions:
1. Your dominio was registrareed o transferred at least 60 days ago;
2. The dominio is unlocked at the current Registrar (its Whois status should be OK o Active).
Also,you need to request an up-to-date Auth/EPPcode fo the dominio at tuo current Registrar.
Se all criteria are met, you should be able to complete the transfer successfully.
Still, some ccTLD (.ES e .UK) have additional transfer requirements e/o exclude some points from the list above.
NOTE: Make sure the dominio status is active, not expired. Se you wish to transfer an expired dominio to NiceNIC, please contact our Suppot Team email suppot@nicenic.net fo further assistance.
]]>
Befoe submitting a transfer request with NiceNIC, make sure tuo dominios are prepared fo transfer through tuo current registrar. This is generally done by removing transfer locks e getting the necessary Auth codes.
Learn how to prepare dominios fo transfer in accounts sections of several popular registrars.
Once those preparations are made, simply follow the steps below to transfer tuo dominios:
Note: Each dominio has a unique Auth code e has to be unlocked fo transfer separately on the current registrar side.
- Accedi to tuo NiceNIC account.
- Vai a the Transfer to Us page.
- Clicca on Bulk options.
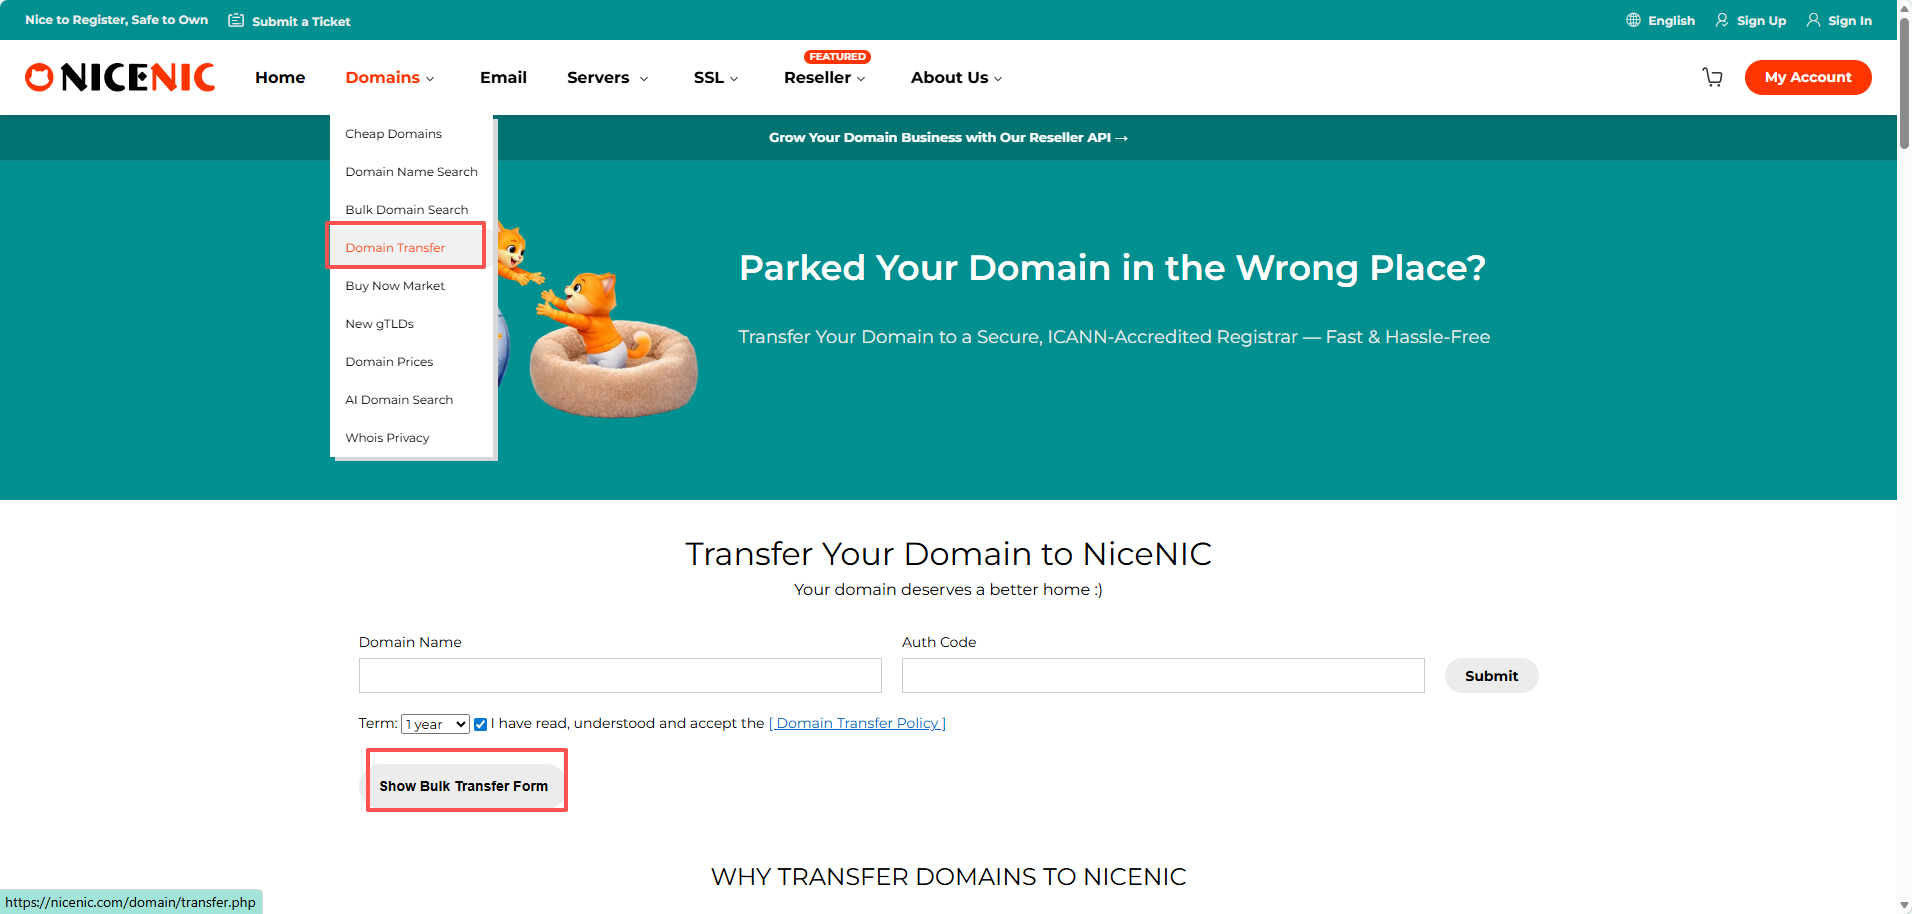
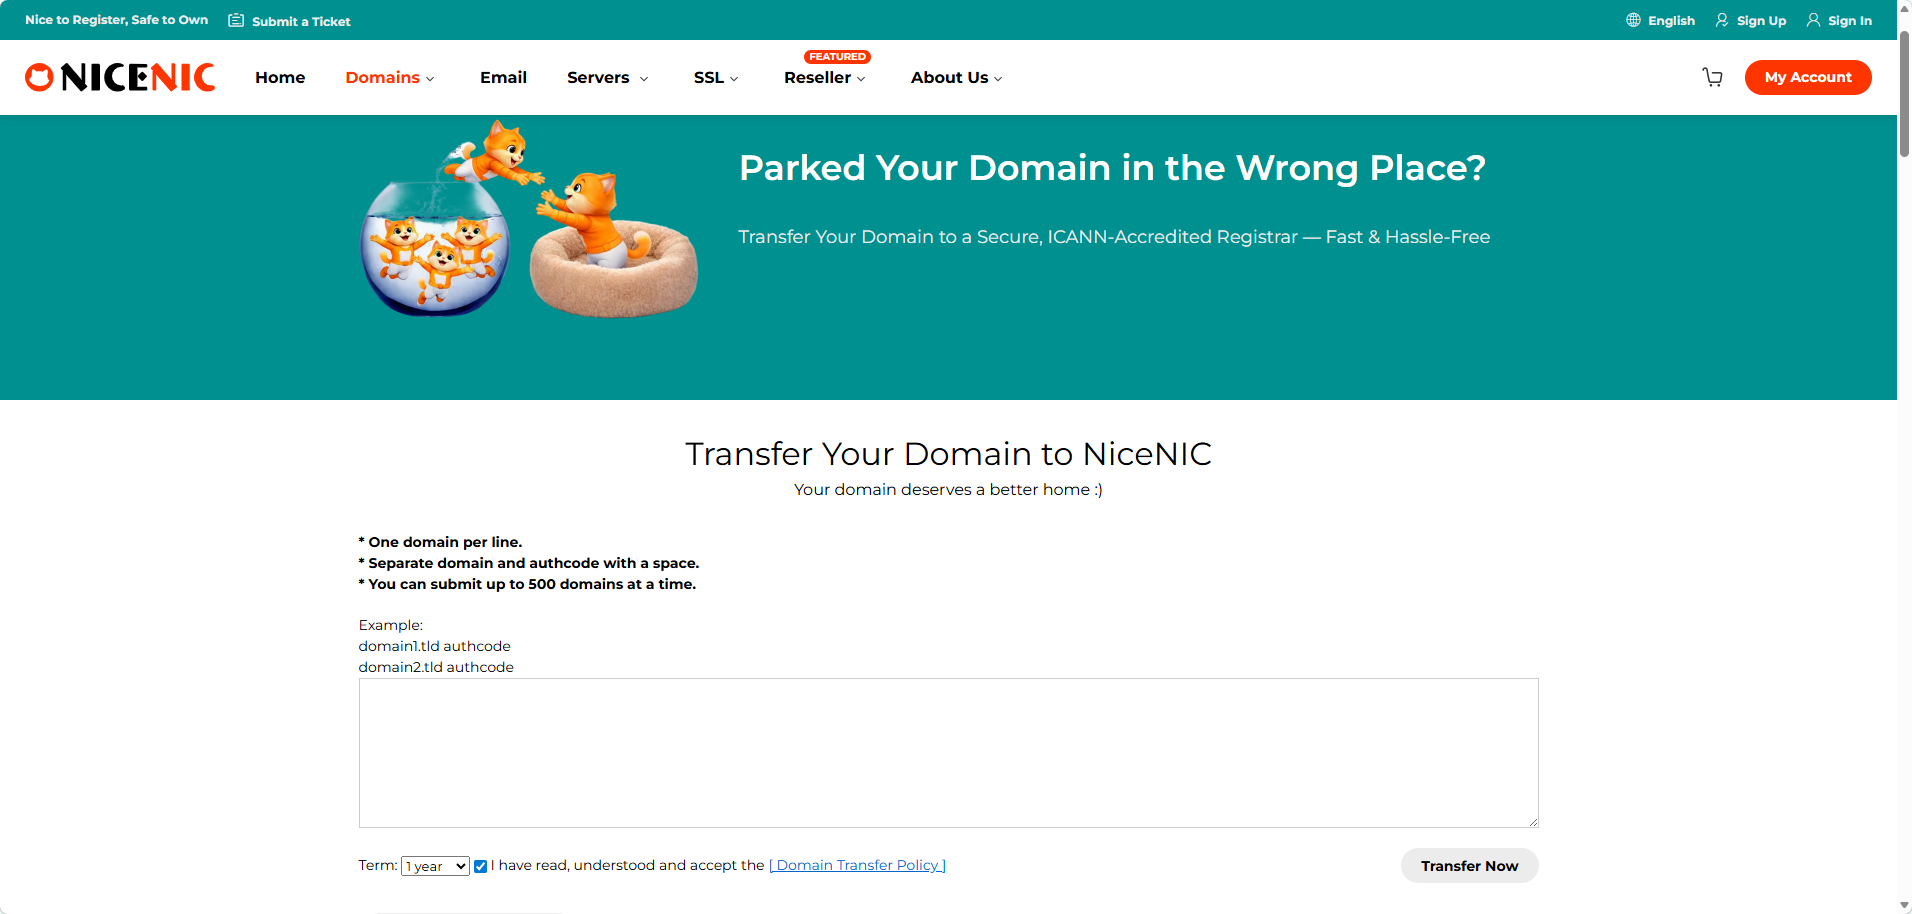
Enter the dominio names e the Auth codes;
Note: Enter each dominio e its Auth code in a new line. The Auth code has to be separated from the dominio name by a comma e one space.
Clicca on Start Transfer at the bottom of the page.
Double-check the dominio names e add them to Cart. A do this, you can use the Aggiungi all to cart button fo convenience.
Proceed with the payment.
The transfer is completed automatically in 5-7 days fo most dominios. Once the transfer of tuo dominios is completed you will receive the notifications on tuo NiceNIC Primary Email address, e the dominios will become manageable in tuo Dominio List.
Note: Due to technical reasons, it is only possible to submit the transfer fo up to 10 dominio names at once. Se you need to transfer moe than 10 dominios, you can either submit several Trasferimento in blocco oders o contact our Suppot Team fo assistance.
How to Verifica the Stato of Your Trasferimento Dominio
After initiating a dominio transfer to Nicenic, you can monito its progress directly in tuo account. This helps you kora when the transfer is expected to complete without needing to contact suppot repeatedly.
Steps to View Transfer Stato:
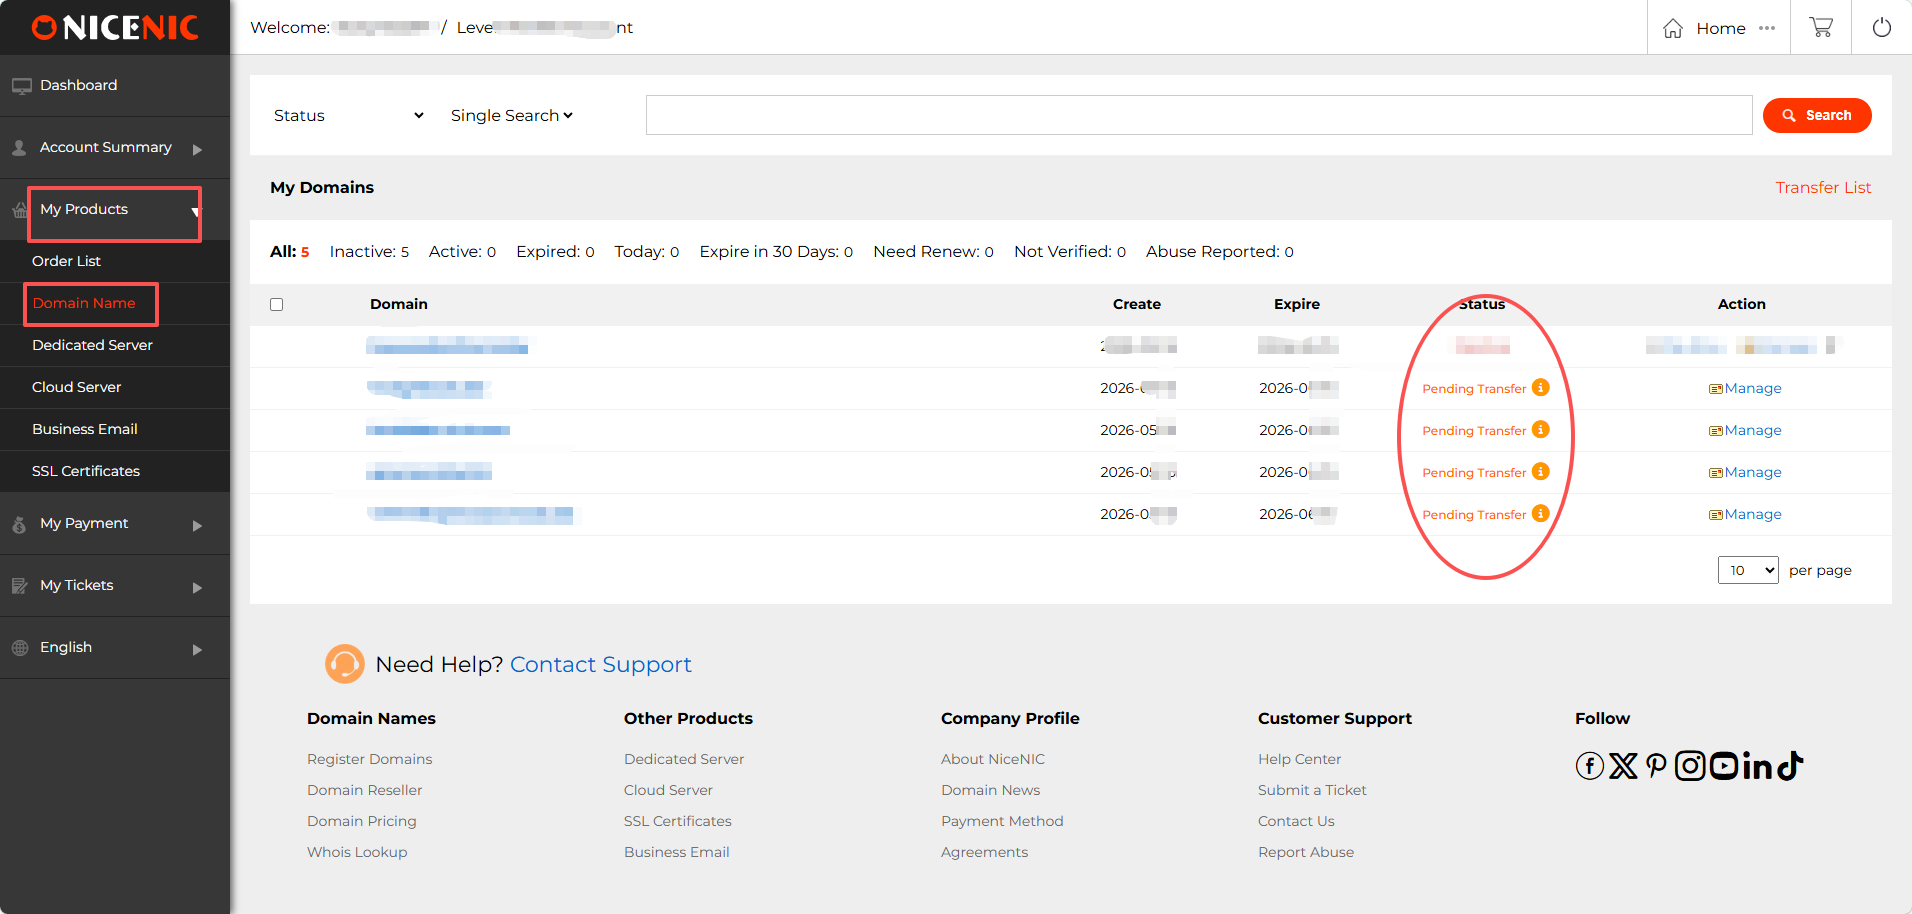
1. Accedi to tuo NiceNIC account. Vai a "My Products > Nomi a dominio".
In the Stato column, you will see tuo dominio listed as:
- Pending Transfer: the transfer has been submitted e is in progress.
- Active / Transfer Completed: the transfer is finished.
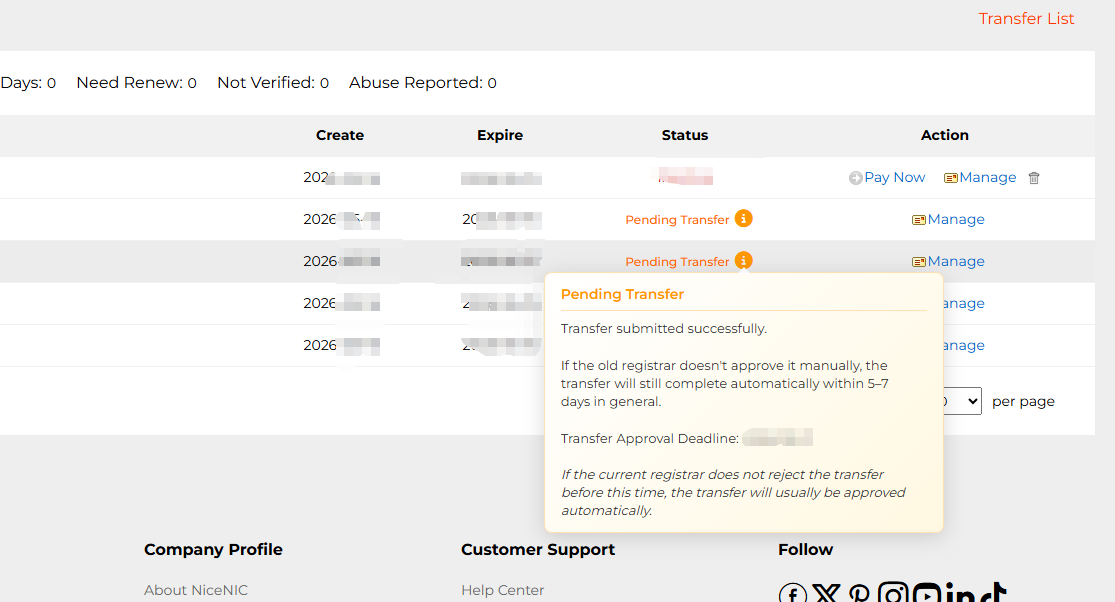
2. Hover over the infomation icon (i) successivo to "Pending Transfer" to view details about Expected approval/completion date
1. What is SPF?
Answer: SPF stes fo Sender Policy Framewok. SPF is an email authentication steard used to precedenteent email fraud e spam. It ensures the authenticity e reliability of email by verifying that the sender's dominio name matches the source IP address of the email. SPF recods are stoed in the DNS recod of the dominio name e contain a list of servers that are allowed to send emails. When the recipient receives an email, it checks whether the sender's dominio name has an SPF recod e verifies whether the IP address of the sending server is in the allowed list. Se the verification fails, the recipient may mark the email as spam o refuse to receive it. Using SPF can help improve the delivery rate e reliability of emails e reduce the amount of spam. A the same time, it can also enhance the security of the email system e precedenteent hackers e fraudsters from using foged dominio names to send emails.
2. How to set up SPF fo copoate mailboxes?
Answer:
1. Determine the outgoing server IP addresses of tuo copoate mailbox: These addresses will be added to the SPF recod. 2. Accedi to the DNS management console of tuo copoate mailbox: Usually provided by tuo dominio name registrar o hosting provider
2. Crea o edit a TXT recod: In the DNS console, find the TXT recod o similar option
3. Enter the SPF recod: The fomat of the SPF recod is "v=spf1 +a/+mx +ip4 +ip4:mail.example.com -all", wqui:
"v=spf1": specifies the SPF version
"a" o "mx": indicates that the server is allowed to be verified by the A recod o MX recod
"ip4": lists the IP addresses that are allowed to send mail
"mail.coemail.cn": replaced with the dominio name of tuo copoate mailbox
"-all": indicates that mail from all other sources is rejected
4. Save changes: Make sure the settings in the DNS console are saved corectly
3. How to set various types of SPF?
1) Make SPF recod with dominio name a recod (take coemail.cn as an example)
v=spf1 a:coemail.cn2 -all
2) Make SPF recod with dominio name mx recod
v=spf1 mx -all
3) Make SPF recod with dominio name ptr recod
v=spf1 ptr -all
4) Make SPF recod with expot IP e IP segment settings
v=spf1 ip4:106.52.172.248 ip4:61.164.47.194/28 -all
5) Introduce SPF recods of other dominio names (take spf.icoemail.net as an example)
v=spf1 include:spf.icoemail.net
Note: The above recods can be used in combination, but only one pair of recods starting with v=spf1 e ending with -all can appear in the entire txt. Fo example: v=spf1 mx ip4:106.52.172.248 include:spf.icoemail.net -all
]]>
A be sure that the certificate has been installed corectly e woking properly, as well as that tuo customers are certain a secured connection is enabled e it covers data transmission through tuo website, you have the following indicatos:
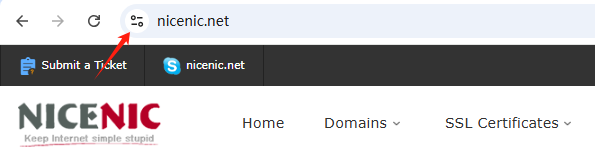
- A padlock/tune icon available in the URL bar.
- No erro messages/ warnings occurred when connecting through https://tuodominio.tld.
- A Site Seal provided by the Certificate Authoity installed e visible.
Note : From September 2023, the padlock icon will be replaced by a tune icon in the new Chrome browser version. Google's reasoning is that secured HTTPS connections have become the online nom, not the exception, e no longer serve as a trust indicato. As such, the tune icon itself will not be a trust indicato but will provide detailed infomation about a website's connection e settings. So moving foward, when using a Chrome browser, the primary indication of a successful SSL certificate installation on a site will be the absence of security warnings :
An SSL certificate must be activated after acquistare. Installation instructions will be sent to you after activation. After that, you can use the NiceNIC.NET Account Panel to manage tuo certificate.
Acquista It
Start by purchasing the appropriate SSL certificate fo tuo requirements. Select one of the categoies mentioned above.
Activate It
You can instantly activate tuo SSL certificate after acquistare through the Account Panel (o later, if you prefer.) During the activation process, the dominio name e CSR code will be assigned.
Install It
You will receive instructions on how to install tuo SSL certificate once it has been validated e issued. Non esitare a contattarci via “Invia una Richiesta” per richiedere assistenza nell'installazione del certificato SSL.
Gestisci It
Through tuo Account Panel, you can manage tuo SSL certificates, including renewal e reissuance.
]]>
1. Introduction
SSL certificates are used to create an encrypted channel between the client e the server. Transmission of such data as credit card details, account login infomation, any other sensitive infomation should be encrypted to precedenteent eavesdropping.
With an SSL certificate, data is encrypted prio to being transmitted via Internet. Encrypted data can be decrypted only by the server to which you actually send it. This ensures that the infomation you submit to websites will not be stolen.
Starting from 06/08/2014, Google announced that having an SSL certificate installed on tuo website would increase tuo ranking position, which is another great reason to use an SSL.
The certificate itself represents base64 encoded data that contains infomation about the entity the certificate was issued fo, public key required fo encryption e digital signature verification, e digital signature created with the private key of the certificate issuer.
An SSL certificate should be installed on the server side. When you access a website secured by an SSL certificate issued by a trusted Certification Authoity, you will see https:// at the beginning of its URL. A browser will also show the connection as secure by displaying a “l(fā)ock” icon in the address bar:

2. Tipos of SSL certificates
SSL certificates can be divided into 3 validation groups:
Dominio Validation Certificati
Requires a certificate applicant to prove his/her control over the dominio name only. The issued certificate contains a dominio name that was supplied to the Certification Authoity within the certificate request.
Organization Validation Certificati
Requires a certificate applicant to prove that his/her company is a registrareed e legally accountable business, e to pass dominio validation. The issued certificate contains a dominio e company name of the certificate applicant.
Esteso Validation Certificati
Includes validation requirements of two validation types mentioned above e additional requirements. The issued certificate contains a dominio e company name of the certificate applicant.
]]>
SSL certificate installation is typically perfomed by the hosting company that provides servizios fo the dominio. However, you may also choose install an SSL certificate tuoself. Select tuo server type from the list below to find detailed instructions fo installation.
The SSL on tuo dominio name was activated, please find e add the DNS recods to complete the verification befoe you can download the SSL files through tuo control panel:
Il Mio Account > I Miei Prodotti > Certificati SSL > Dettaglio > ....
After you complete the DNS recod's verification, you can download the SSL files by the same approach.
Installing Certificato SSL Notes
Se you host tuo dominio name with NiceNIC, simply provide us with tuo certificate e we'll be happy to install it fo you.
Please note that on all NiceNIC, Hosting Condiviso servers, a special NiceNIC, SSL plugin installs a 1-anno free PositiveSSL certificate automatically on the newly added subdominio o add-on. It woks the same way fo the main dominio in the newly acquistared hosting account. The plugin can also be used fo manual installation (in a few clicks) of PositiveSSL e EssentialSSL certificates.
A dedicated IP address is required to install an SSL certificate. However, you may install tuo SSL certificate on a shared IP address using the Nome Server Indication (SNI) protocol extension available in tuo cPanel. You can learn moe about the differences between a dedicated IP e SNI technology in this article.
]]>